How to Build an IKEA Cat Tree for Under $32
Seeing as we're so busy spending money on 16 new bumpers for the car, I wasn't ready to drop another $100+ on a cat tree. So in true DIY spirit, I decided to make my own. After a bit of googling, I decided to go the IKEA 'hack' route. I took my inspiration from this tree on IKEA Hackers.
Tair loves the little gadgets in IKEA so it wasn't too hard to convince him to go, although I don't think he fully understood what I planned to do until we were standing by the display of tables with me jabbering about whether two end tables or a coffee table and an end table would be better to use. But, seeing as a LACK end table is only ₪45 (~$11.25), he couldn't really object to my brilliant master plan.
As we walked around the rest of IKEA, buying things we probably didn't need, I also picked up a rug for the table tops and gathered ideas for what else I could add.
My neighborhood is across the street from an "industrial area" which is basically just home to a few offices and some random stores, all of which lots of useful junk out by the road for collection. No matter where you live, you can usually find some array of things to repurpose whether they be broken bits of furniature, wood palletes, plastic crates, branches, boxes, etc. Of course be sure to check anything you take from outside for any dangers like sharp edges, splinters, open nails, rust and so on, and do at least a basic wipe down if not a thourough cleaning.
After all was said and done here was my materials list:
Step 1

DIY IKEA Style
Tair loves the little gadgets in IKEA so it wasn't too hard to convince him to go, although I don't think he fully understood what I planned to do until we were standing by the display of tables with me jabbering about whether two end tables or a coffee table and an end table would be better to use. But, seeing as a LACK end table is only ₪45 (~$11.25), he couldn't really object to my brilliant master plan.
As we walked around the rest of IKEA, buying things we probably didn't need, I also picked up a rug for the table tops and gathered ideas for what else I could add.
My neighborhood is across the street from an "industrial area" which is basically just home to a few offices and some random stores, all of which lots of useful junk out by the road for collection. No matter where you live, you can usually find some array of things to repurpose whether they be broken bits of furniature, wood palletes, plastic crates, branches, boxes, etc. Of course be sure to check anything you take from outside for any dangers like sharp edges, splinters, open nails, rust and so on, and do at least a basic wipe down if not a thourough cleaning.
After all was said and done here was my materials list:
| 2 LACK End tables | ₪90 (~$22) |
| 1 SIGNE Rug | ₪15 (~$4) |
| 9 Right-angle brackets | ₪20 (~$5) |
| Cardboard Box | FREE |
| A drawer I found outside | FREE |
| Miscelaneous Screws/Nails | Varies |
| Total | ₪125 (~$31) |
Building your DIY Cat Tree
Step 1
Build the IKEA tables. Since the LACK side tables are one of the easiest IKEA assemblies, this didn't take much time at all. If you use the coffee table instead, the pictionary-style instructions will probably confuse you.
Step 2
Cut the SIGNE rug in half and hot glue each half to a table top.
Step 3
Attach any extra pieces that you've found or purchased.
 Tair, determined to get the drawer to sit evenly on the brackets we bought, cut a chunk out of the drawer using a rotary tool, hammer and screwdriver (as a wedge), making a big saw-dusty mess as he did so. We then screwed the brackets into the table legs and bottom of the drawer.
Afterwards, in a stroke of genius, he bolted several of the smaller brackets together to stabalize the back of the drawer. If I had realized how low the drawer would be, I would have just bolted it right to the table top but alas....
 Step 4
Attach the legs of the top table to the top of the bottom. I used 4 of the small right angle brackets to attach the legs. Some other tutorials I saw used glue but the way our kiddies run into things, I don't really trust glue to hold.
Step 5
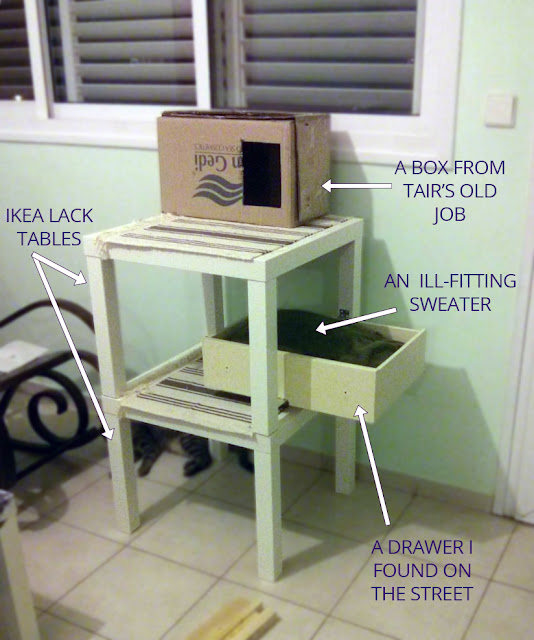
Add the finishing touches. I stuffed an old sweater with an old pillow to cushion the drawer and added a box that we had already cut a hole in for Cleo when she was smaller at the top.
A trick I learned selling flowers for mothers day:
To make a box smaller, make a cut all the way around, then smoosh one side into the other to create a smaller box! If you look closely at the top photo you'll see what I mean.
Done!


Afterwards, in a stroke of genius, he bolted several of the smaller brackets together to stabalize the back of the drawer. If I had realized how low the drawer would be, I would have just bolted it right to the table top but alas....
 Step 4
Attach the legs of the top table to the top of the bottom. I used 4 of the small right angle brackets to attach the legs. Some other tutorials I saw used glue but the way our kiddies run into things, I don't really trust glue to hold.
Step 5
Add the finishing touches. I stuffed an old sweater with an old pillow to cushion the drawer and added a box that we had already cut a hole in for Cleo when she was smaller at the top.
A trick I learned selling flowers for mothers day:
To make a box smaller, make a cut all the way around, then smoosh one side into the other to create a smaller box! If you look closely at the top photo you'll see what I mean.
Done!
The cats love their IKEA Cat Tree


Comments
Post a Comment
Irrelevant or disrespectful comments will be deleted at author's discretion.